
Making WordPress Abilities Usable by AI Agents with the MCP Adapter
WordPress automation is shifting from one-off integrations to AI-driven workflows. The big unlock is that AI tools need structured capabilities they can reliably discover and execute-without scraping admin screens or guessing endpoints.
That’s exactly what the Abilities API (introduced in WordPress 6.9) and the WordPress MCP Adapter are about: define your site’s capabilities once as typed, permissioned units of work, then let MCP-aware AI clients use them as Model Context Protocol (MCP) tools.
Quick recap: Abilities are the foundation
The Abilities API provides a first-class, cross-context functional API for WordPress: a standard way for Core and plugins to expose what they can do. The goal is to make functionality standardized, discoverable, typed, and executable across PHP, JavaScript, and the REST API.
You register an ability once, and it becomes something other systems (including AI clients) can understand and use consistently.
- A unique name in the form
namespace/ability-name - A typed input schema and output schema
- A
permission_callbackthat enforces capabilities - An
execute_callbackthat performs the actual functionality
The execute_callback can wrap basically any discrete unit of work: fetching data, updating posts, running diagnostics, and so on.
WordPress 6.9 ships with three Core abilities you can use immediately to test an MCP setup:
core/get-site-info: Returns site information configured in WordPress. By default, returns all fields, or optionally a filtered subset.core/get-user-info: Returns basic profile details for the current authenticated user to support personalization, auditing, and access-aware behavior.core/get-environment-info: Returns core details about the site’s runtime context for diagnostics and compatibility (environment, PHP runtime, database server info, WordPress version).
What the WordPress MCP Adapter does (and why it matters)
The WordPress MCP Adapter is an official package in the AI Building Blocks for WordPress initiative. Its role is to map Abilities into the MCP primitives so AI agents can:
- discover and execute site functionality as MCP tools
- read WordPress data as MCP resources
In practice, if your plugin already registers abilities, you’re very close to letting an AI agent use them-without inventing a separate AI-only API.
MCP primitives: tools, resources, prompts
MCP organizes AI interactions using three primitives:
- Tools: executable functions the AI calls to perform actions.
- Resources: passive data sources the AI reads for context (files, database rows, etc.).
- Prompts: pre-configured templates to guide specific workflows.
With the adapter, Abilities typically become tools because they represent executable logic. But if an ability is purely read-only (for example, returning a debug log or static configuration), you can also configure it as a resource so the AI can ingest it as background context without “calling” a tool.
Installing the MCP Adapter (plugin route)
The fastest way to get started is to install the adapter as a plugin from the GitHub Releases page. Once activated, it registers a default MCP server named mcp-adapter-default-server and also registers three custom abilities:
mcp-adapter/discover-abilitiesmcp-adapter/get-ability-infomcp-adapter/execute-ability
Those abilities are automatically exposed as MCP tools:
mcp-adapter-discover-abilitiesmcp-adapter-get-ability-infomcp-adapter-execute-ability
Together they give AI agents a layered flow (discover → inspect → execute) for working with WordPress abilities.
Making abilities available on the default MCP server
The default server does not expose every ability automatically. Abilities are only available through mcp-adapter-default-server when explicitly marked as public for MCP access via a meta.mcp.public flag during registration with wp_register_ability().
'meta' => array(
    'mcp' => array(
        'public' => true,  // Required for MCP default server access
    ),
),For Core abilities (where you don’t control the original registration), you can use the wp_register_ability_args filter to inject that metadata.
<?php
/**
 * Plugin Name: Enable core abilities
 * Version: 1.0.0
 *
 * @package enable-core-abilities
 */

add_filter( 'wp_register_ability_args', 'myplugin_enable_core_abilities_mcp_access', 10, 2 );
/**
 * Enable MCP access for core abilities.
 *
 * @param array  $args         Ability registration arguments.
 * @param string $ability_name Ability ID.
 * @return array Modified ability registration arguments.
 */
function myplugin_enable_core_abilities_mcp_access( array $args, string $ability_name ) {
    // Enable MCP access for the three current core abilities.
    $core_abilities = array(
        'core/get-site-info',
        'core/get-user-info',
        'core/get-environment-info',
    );
    if ( in_array( $ability_name, $core_abilities, true ) ) {
        $args['meta']['mcp']['public'] = true;
    }

    return $args;
}
Once those flags are set, MCP-aware AI clients can connect to your WordPress site and call the Core abilities through the adapter’s tool layer.
Connecting AI applications to an MCP-enabled WordPress site
Transport methods: STDIO vs HTTP
MCP supports two transport mechanisms: STDIO and HTTP. Which one you choose depends mostly on where WordPress is running.
For local development environments, STDIO transport is usually the simplest option. The MCP Adapter supports STDIO via WP-CLI, so you’ll need WP-CLI installed locally.
{
  "wordpress-mcp-server": {
    "command": "wp",
    "args": [
      "--path=/path/to/your/wordpress/installation",
      "mcp-adapter",
      "serve",
      "--server=mcp-adapter-default-server",
      "--user={admin_user}"
    ]
  }
}
- The server name here is
wordpress-mcp-server(you can choose any name). - The command is
wp(WP-CLI). - The args include:
--pathto your WordPress install,mcp-adapter serveto start the MCP server,--serverto select the MCP server (default shown here), and--userto authenticate as a specific WordPress user (e.g. an admin).
For publicly accessible WordPress installs-or if you’d rather not run STDIO-you can use HTTP transport via the remote proxy package @automattic/mcp-wordpress-remote. This requires Node.js and authentication via application passwords (or a custom OAuth implementation).
{
  "wordpress-mcp-server": {
    "command": "npx",
    "args": ["-y", "@automattic/mcp-wordpress-remote@latest"],
    "env": {
      "WP_API_URL": "https://yoursite.example/wp-json/mcp/mcp-adapter-default-server",
      "WP_API_USERNAME": "{admin_user}",
      "WP_API_PASSWORD": "{application-password}"
    }
  }
}
- Command is
npxto execute the Node package. - Args include
-yto auto-agree to install and@automattic/mcp-wordpress-remote@latestto use the latest proxy. - Env values:
WP_API_URL(your site’s MCP endpoint),WP_API_USERNAME, andWP_API_PASSWORD(the application password).
If you’re using the HTTP remote proxy against a local WordPress site and hit connection issues, the package includes troubleshooting guidance: https://github.com/Automattic/mcp-wordpress-remote/blob/trunk/Docs/troubleshooting.md. The common pain points are multiple Node versions and local SSL certificates.
App-specific configuration recipes
Different clients store MCP configs in different places, but the server definition format is largely consistent. Below are the exact configuration patterns used by popular tools.
Claude Desktop
Claude Desktop has built-in MCP support. Configure MCP servers under the Developer tab (Claude → Settings → Developer), then Edit config under Local MCP servers. That opens claude_desktop_config.json, where MCP servers live inside a mcpServers object.
{
  "mcpServers": {
  }
}
STDIO transport example:
{
  "mcpServers": {
    "wordpress-mcp-server": {
      "command": "wp",
      "args": [
        "--path=/Users/jonathanbossenger/Studio/wordpress-mcp",
        "mcp-adapter",
        "serve",
        "--server=mcp-adapter-default-server",
        "--user=admin"
      ]
    }
  }
}
HTTP transport example:
{
  "mcpServers": {
    "wordpress-mcp-server": {
      "command": "npx",
      "args": ["-y", "@automattic/mcp-wordpress-remote@latest"],
      "env": {
        "WP_API_URL": "http://localhost:8885/wp-json/mcp/mcp-adapter-default-server",
        "WP_API_USERNAME": "admin",
        "WP_API_PASSWORD": "2SEB qW5j D7CW fpsh pbmN RGva"
      }
    }
  }
}
After saving, restart Claude Desktop-MCP servers are read on startup. When configured correctly, your server appears under Local MCP servers with a running status.
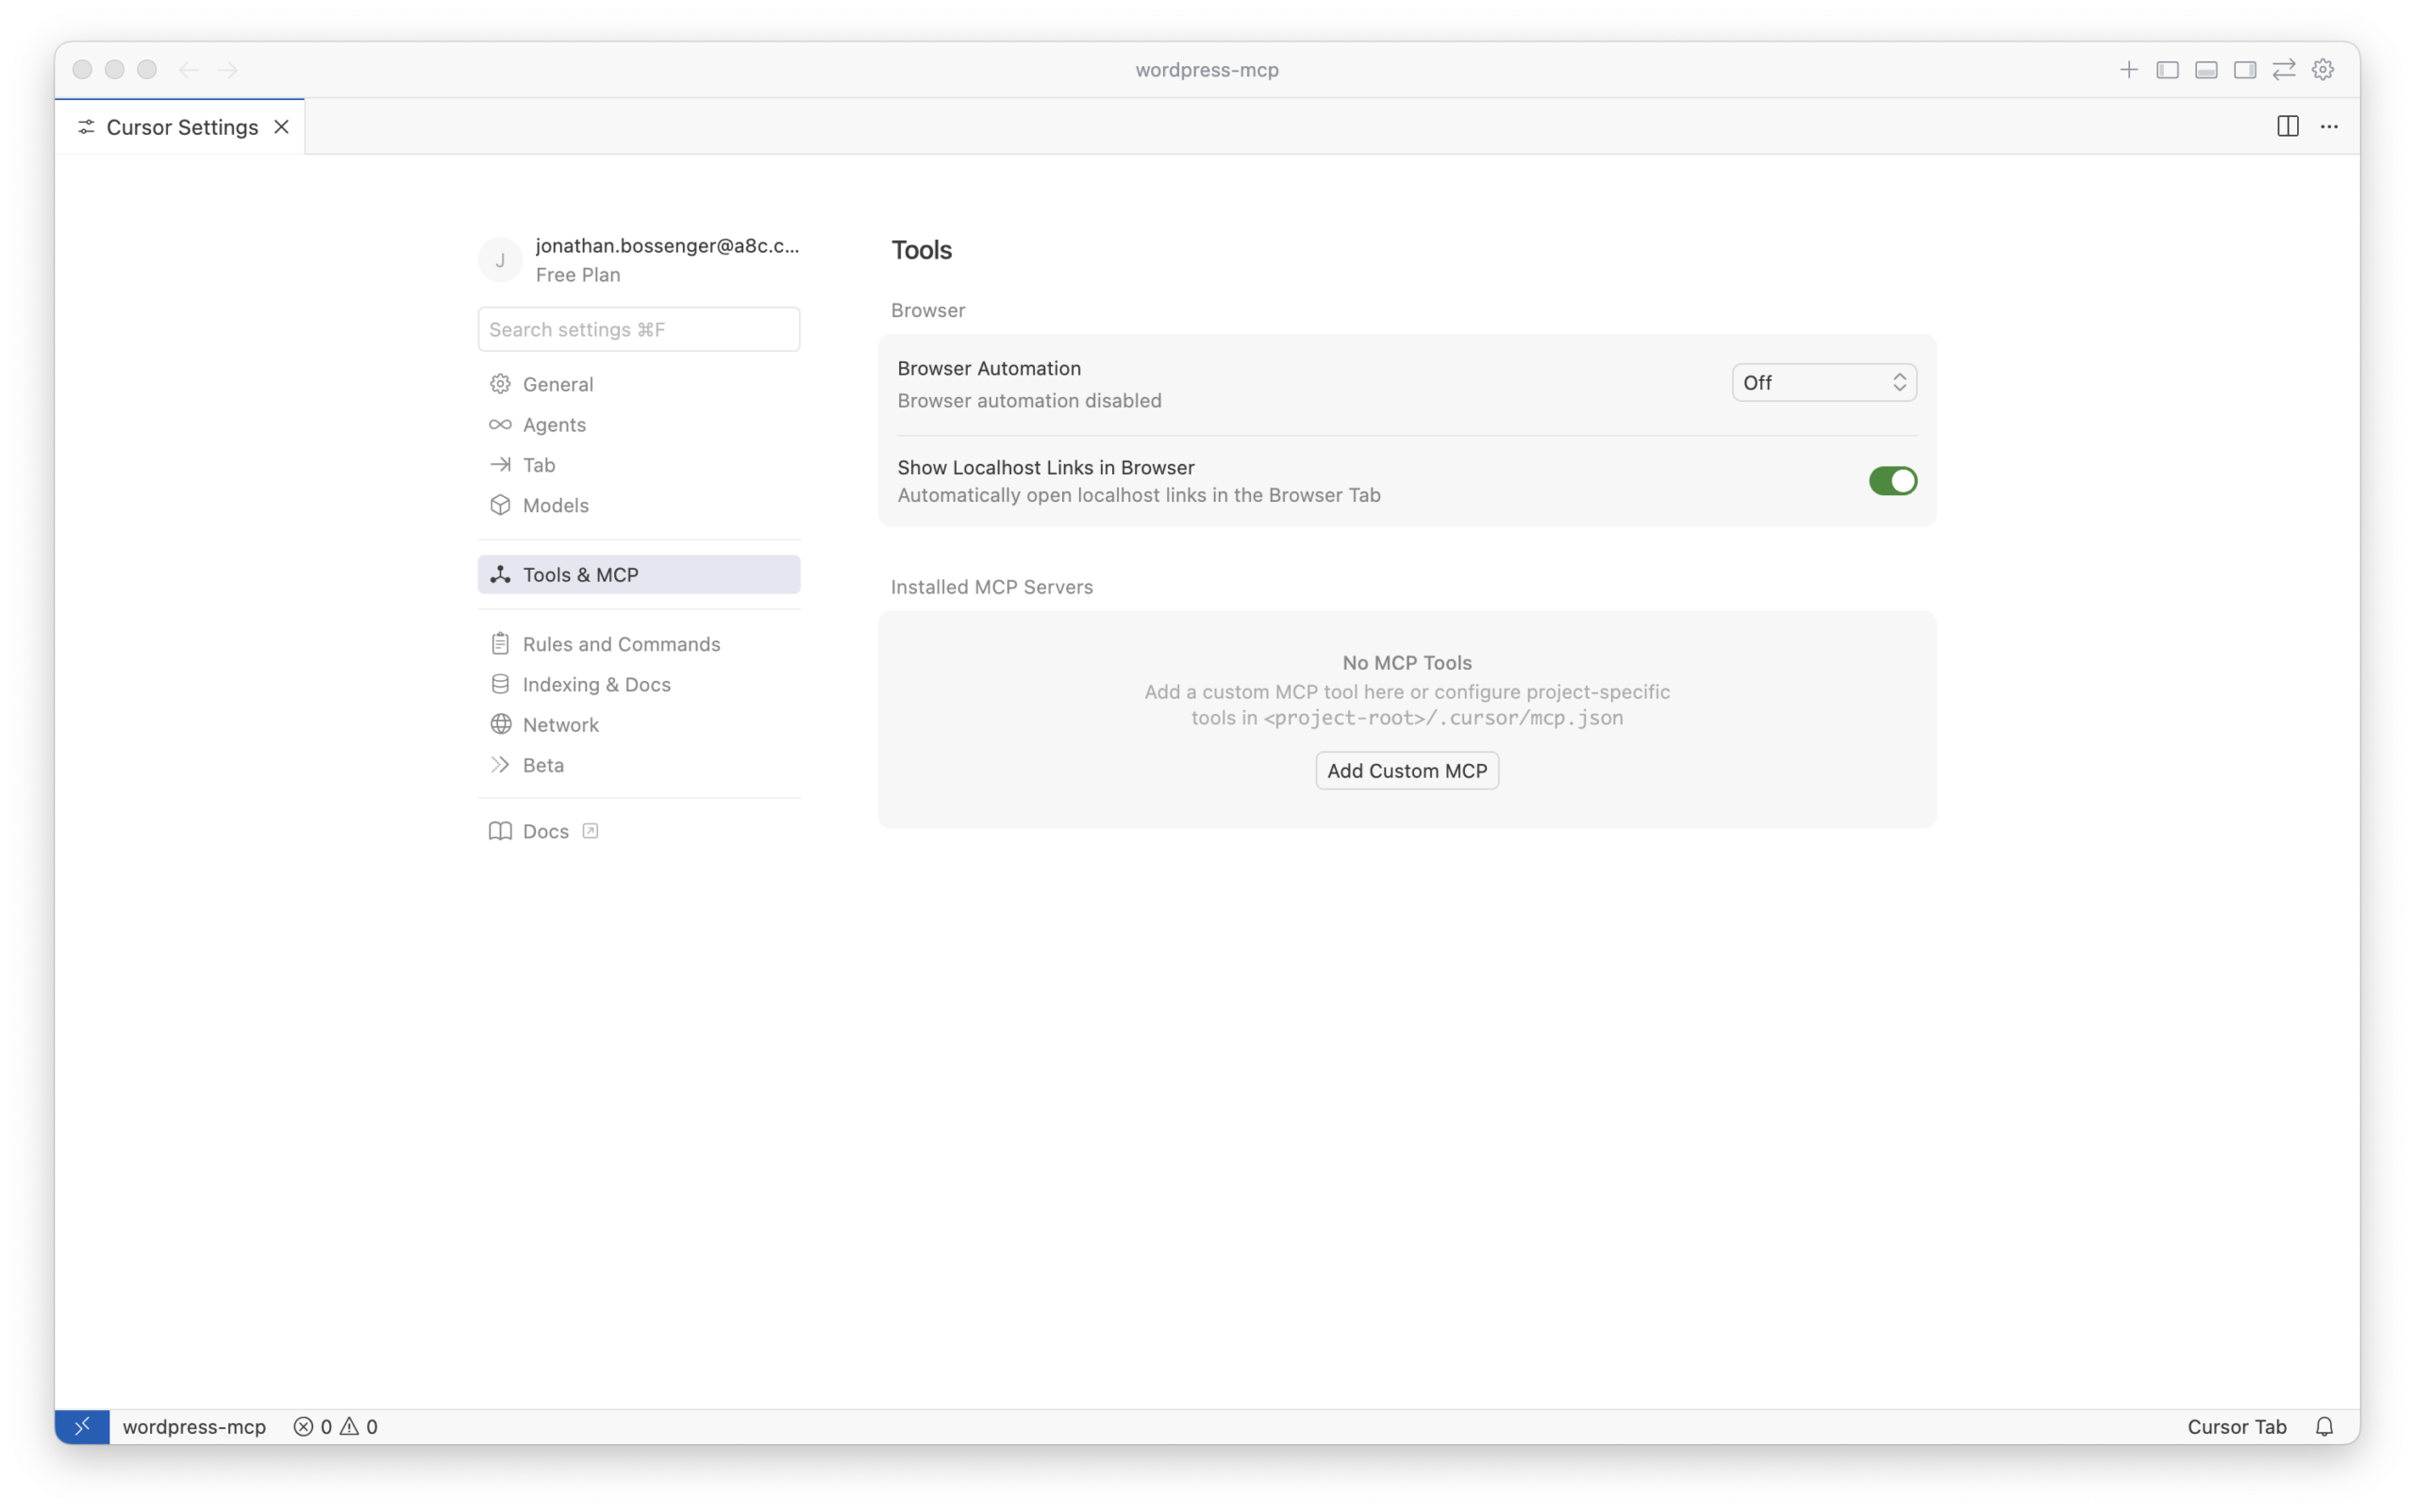
Cursor
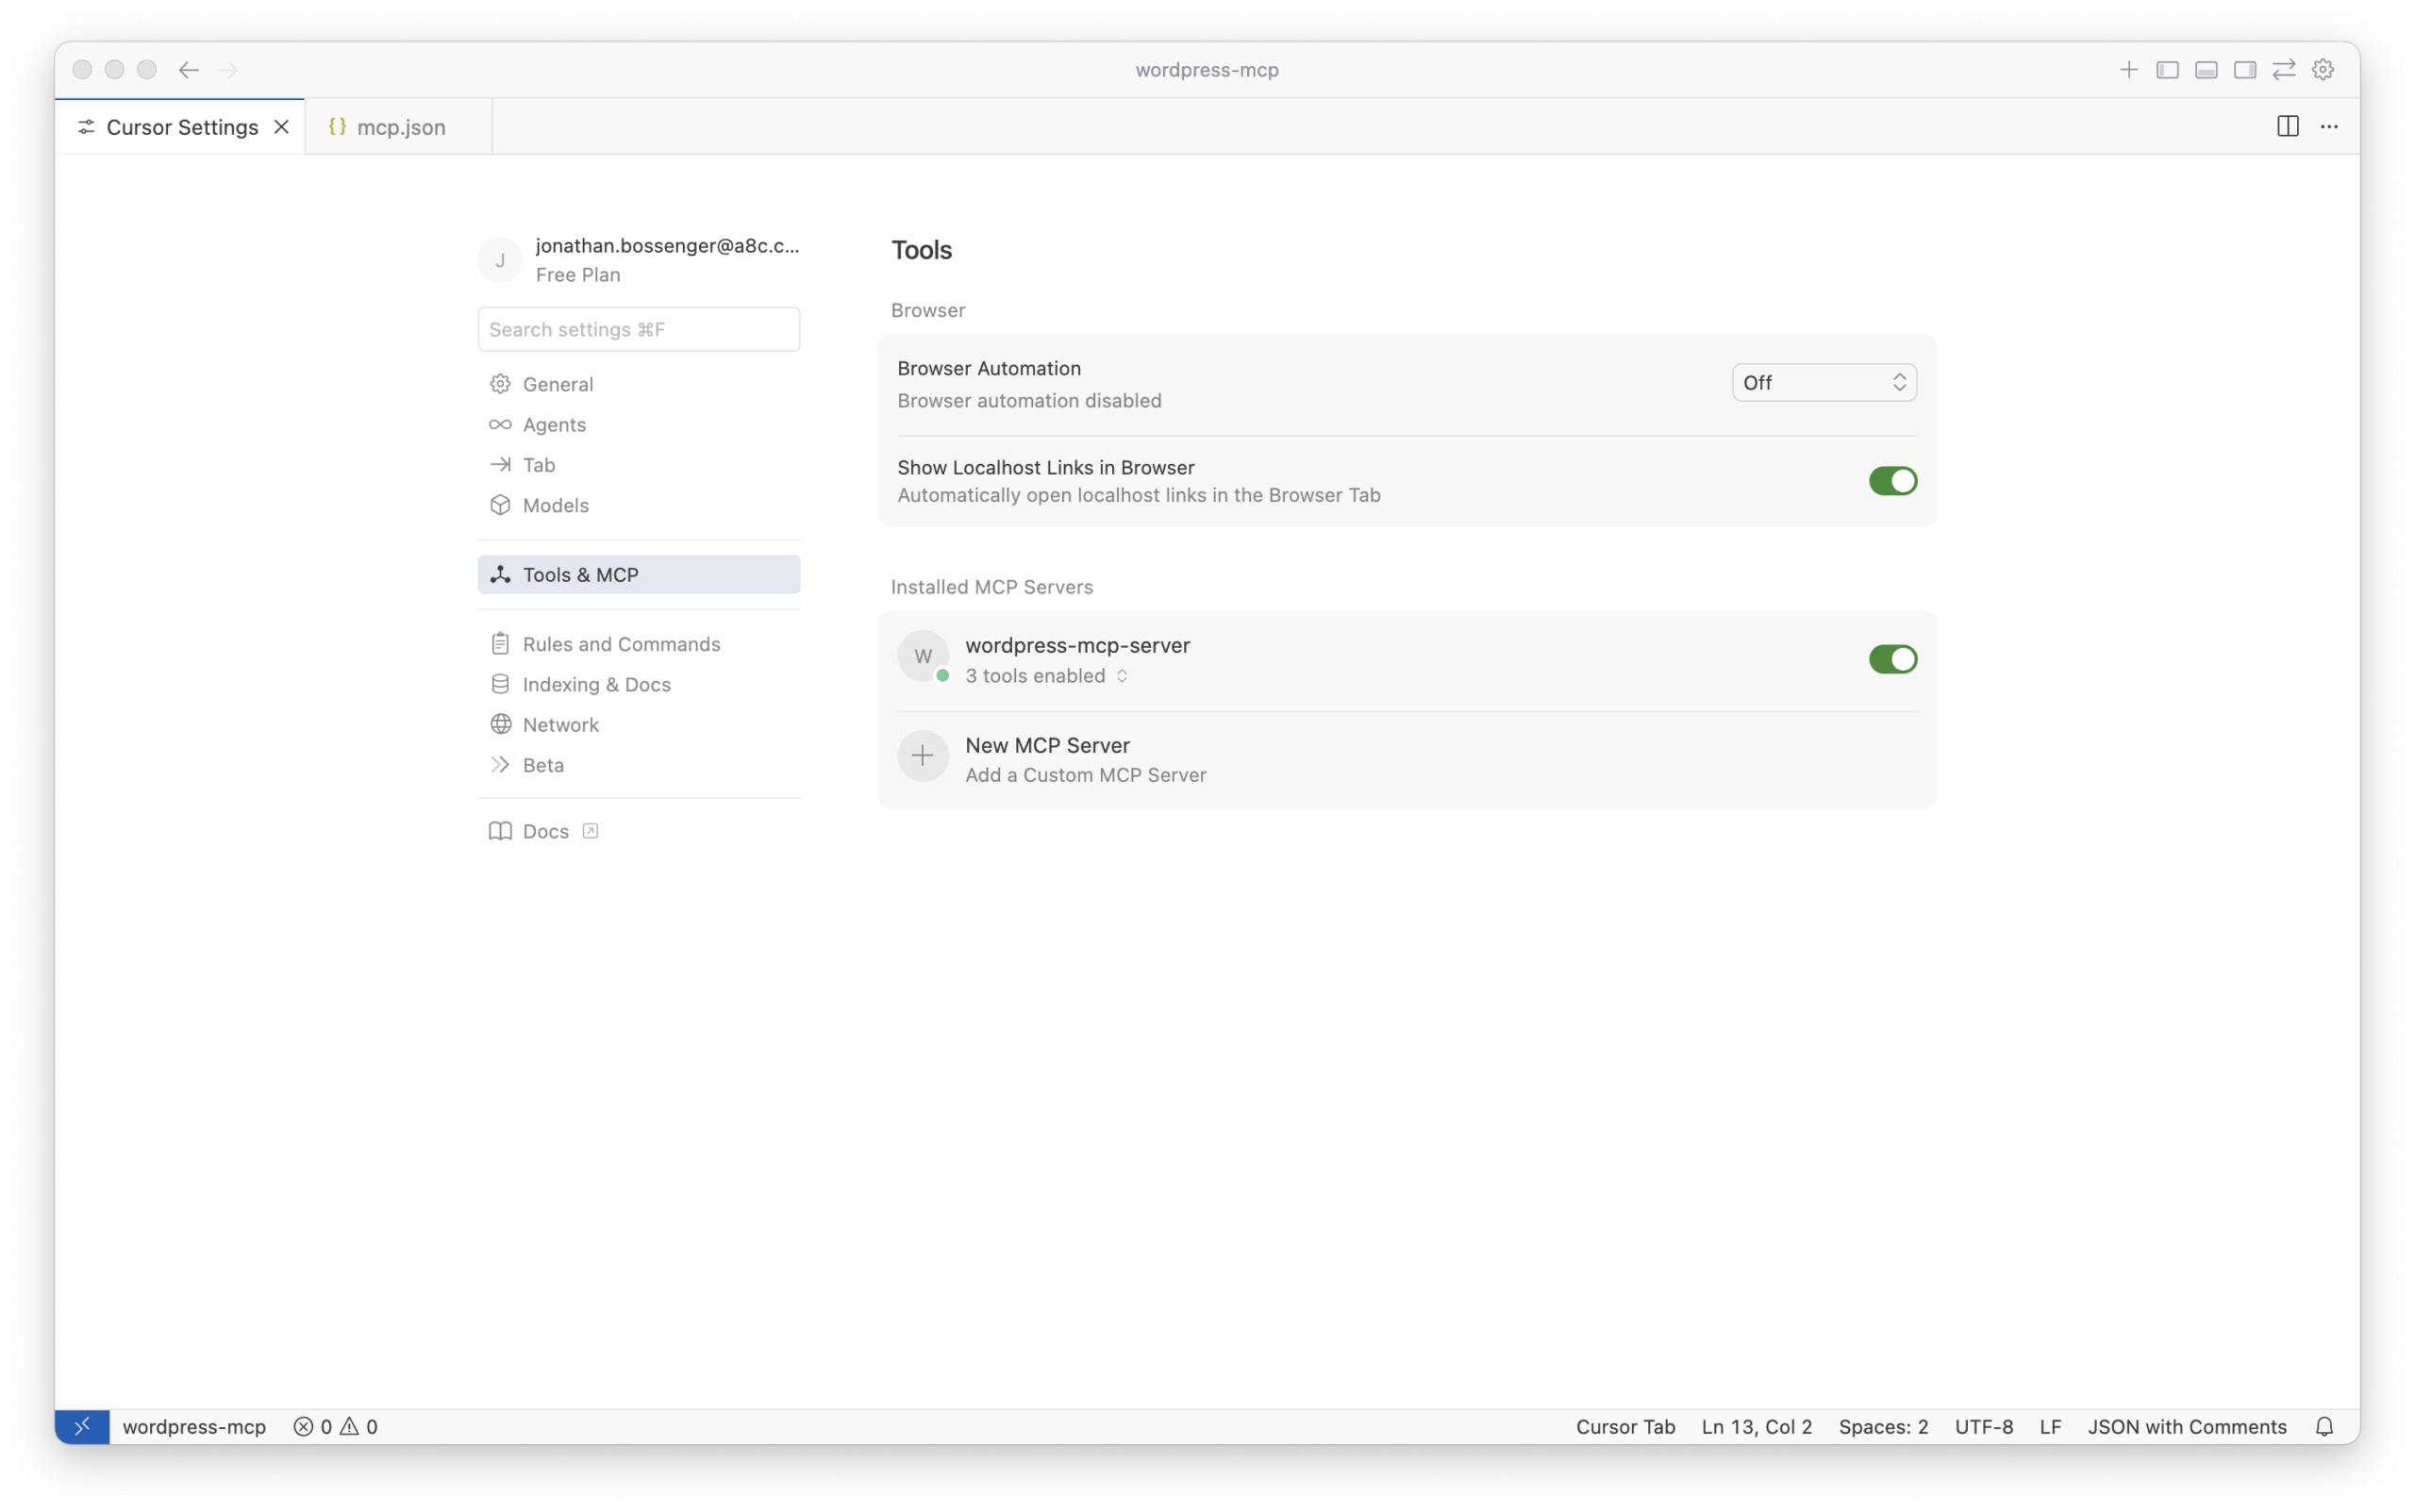
In Cursor, open Settings (Cursor → Settings → Cursor Settings), then go to Tools and MCP. Click Add Custom MCP to open mcp.json. The server configuration format matches Claude Desktop.
After saving, return to Tools and MCP, verify the server is listed, and enable it for coding sessions.
Claude Code
Claude Code supports MCP servers either globally or per-project. You can add an mcpServers object to a .claude.json file in your home directory (global), or create a .mcp.json file in your project directory (project-scoped). Either way, the server config format is the same as Claude Desktop or Cursor.
VS Code
VS Code MCP setup uses a JSON file-typically mcp.json inside a .vscode folder in your workspace-following VS Code’s MCP server configuration format: https://code.visualstudio.com/docs/copilot/customization/mcp-servers.
The key difference: VS Code expects servers under a servers object (not mcpServers). Everything else in the server definition is the same.
{
  "servers": {
    // MCP server definitions go here
  }
}
Once configured, VS Code shows an MCP control toolbar for starting/stopping/restarting servers, and reports how many tools are available.
Using MCP tools: what an AI client actually does
Once your MCP server is connected, you can ask an AI client to perform WordPress tasks. For example: “Get the site info from my WordPress site.”
A client like Claude Desktop will typically:
- Detect that an MCP server is available.
- Call
mcp-adapter-discover-abilitiesto list accessible abilities. - Choose the relevant ability (e.g.
core/get-site-info). - Call
mcp-adapter-execute-ability, passing the chosen ability name. - Receive structured output and present it as an answer.
Creating custom MCP servers inside your plugin
The default MCP server will cover many cases, but custom MCP servers are useful when you want tighter control over which abilities are exposed and how they’re presented to AI clients.
To do this in a plugin, install the MCP Adapter package via Composer and register your own server.
1) Install the package via Composer
composer require wordpress/mcp-adapter
2) Load the Composer autoloader
if ( file_exists( __DIR__ . '/vendor/autoload.php' ) ) {
    require_once __DIR__ . '/vendor/autoload.php';
}
If multiple plugins might depend on the MCP Adapter or the Abilities API, it’s recommended to use the Jetpack Autoloader to avoid version conflicts: https://github.com/WordPress/mcp-adapter/blob/trunk/docs/getting-started/installation.md#using-jetpack-autoloader-highly-recommended.
3) Initialize the MCP Adapter
if ( ! class_exists( WPMCPCoreMcpAdapter::class ) ) {
    // check if the MCP Adapter class is available, if not show some sort of error or admin notice
    return;
}

// Initialize MCP Adapter and its default server.
WPMCPCoreMcpAdapter::instance();
4) Register a custom server on mcp_adapter_init
Hook into mcp_adapter_init. The callback receives the McpAdapter instance, and you can call create_server() with your server configuration.
add_action( 'mcp_adapter_init', 'myplugin_create_custom_mcp_server' );
function myplugin_create_custom_mcp_server( $adapter ) {
    $adapter = WPMCPCoreMcpAdapter::instance();
    $adapter->create_server(
        'custom-mcp-server', // Unique server identifier.
        'custom-mcp-server', // REST API namespace.
        'mcp',               // REST API route.
        'Custom MCP Server', // Server name.
        'Custom MCP Server', // Server description.
        'v1.0.0',            // Server version.
        array(               // Transport methods.
            WPMCPTransportHttpTransport::class,  // Recommended: MCP 2025-06-18 compliant.
        ),
        WPMCPInfrastructureErrorHandlingErrorLogMcpErrorHandler::class, // Error handler.
        WPMCPInfrastructureObservabilityNullMcpObservabilityHandler::class, // Observability handler.
        array( 'namespace/ability-name' ), // Abilities to expose as tools
        array(),                           // Resources (optional).
        array(),                           // Prompts (optional).
    );
}
Parameters worth paying attention to:
- Parameter 1: unique server identifier (also used when starting the server via WP-CLI).
- Parameters 2–3: REST API namespace and route.
- Parameters 4–5: server name and description shown in AI apps.
- Parameter 6: server version.
- Parameter 10: array of ability names to expose as MCP tools (can be multiple).
- Other parameters control transport methods, error handling, and observability. You can also build custom handlers if you need to integrate with your own transport, logging, or monitoring systems.
Hands-on example: adding a custom MCP server to “List All URLs”
To make the custom server concept concrete, here’s a full workflow using the “List All URLs” plugin (https://github.com/wptrainingteam/list-all-urls) and its Abilities API branch.
Before you start
Deactivate the MCP Adapter plugin if it’s currently active. This example uses the Composer package approach inside the plugin.
1) Clone the plugin repository
cd wp-content/plugins
git clone git@github.com:wptrainingteam/list-all-urls.git
2) Switch to the Abilities implementation branch
cd list-all-urls
git checkout abilities
3) Install dependencies
composer install
4) Require the MCP Adapter package
composer require wordpress/mcp-adapter
5) Initialize the adapter and register a custom server
Open list-all-urls.php and add the following to the bottom of the file. This creates an MCP server that exposes only the list-all-urls/urls ability.
if ( ! class_exists( WPMCPCoreMcpAdapter::class ) ) {
    return;
}

// Initialize MCP Adapter and its default server.
WPMCPCoreMcpAdapter::instance();

add_action( 'mcp_adapter_init', 'list_all_urls_create_custom_mcp_server' );
/**
 * Create a custom MCP server for the List All URLs plugin.
 *
 * @param object $adapter WPMCPCoreMcpAdapter The MCP Adapter instance.
 * @return void
 */
function list_all_urls_create_custom_mcp_server( $adapter ) {
    $adapter = WPMCPCoreMcpAdapter::instance();
    $adapter->create_server(
        'list-all-urls-mcp-server',
        'list-all-urls-mcp-server',
        'mcp',
        'List All URLS MCP Server',
        'Custom MCP Server for the List All URLs plugin. Currently exposes only the list-all-urls/urls ability as an MCP Tool.',
        'v1.0.0',
        array(
            WPMCPTransportHttpTransport::class,
        ),
        WPMCPInfrastructureErrorHandlingErrorLogMcpErrorHandler::class,
        WPMCPInfrastructureObservabilityNullMcpObservabilityHandler::class,
        array( 'list-all-urls/urls' ),
    );
}
A key detail: because this custom server explicitly exposes the ability, you don’t need to set meta.mcp.public for list-all-urls/urls.
6) Activate the plugin and update your AI app config
Activate “List All URLs” in the WordPress admin. Then update your AI client to connect to the new server identifier list-all-urls-mcp-server.
Here’s an example .vscode/mcp.json that configures both the adapter default server and the new List All URLs server, both using STDIO transport:
{
  "servers": {
    "wordpress-mcp-server": {
      "command": "wp",
      "args": [
        "--path=/Users/jonathanbossenger/Studio/wordpress-mcp",
        "mcp-adapter",
        "serve",
        "--server=mcp-adapter-default-server",
        "--user=admin"
      ]
    },
    "list-all-urls-mcp-server": {
      "command": "wp",
      "args": [
        "--path=/Users/jonathanbossenger/Studio/wordpress-mcp",
        "mcp-adapter",
        "serve",
        "--server=list-all-urls-mcp-server",
        "--user=admin"
      ]
    }
  }
}
Most AI clients support multiple MCP servers simultaneously, which makes it practical to separate concerns: one server for general site abilities, another server for plugin-specific tools.
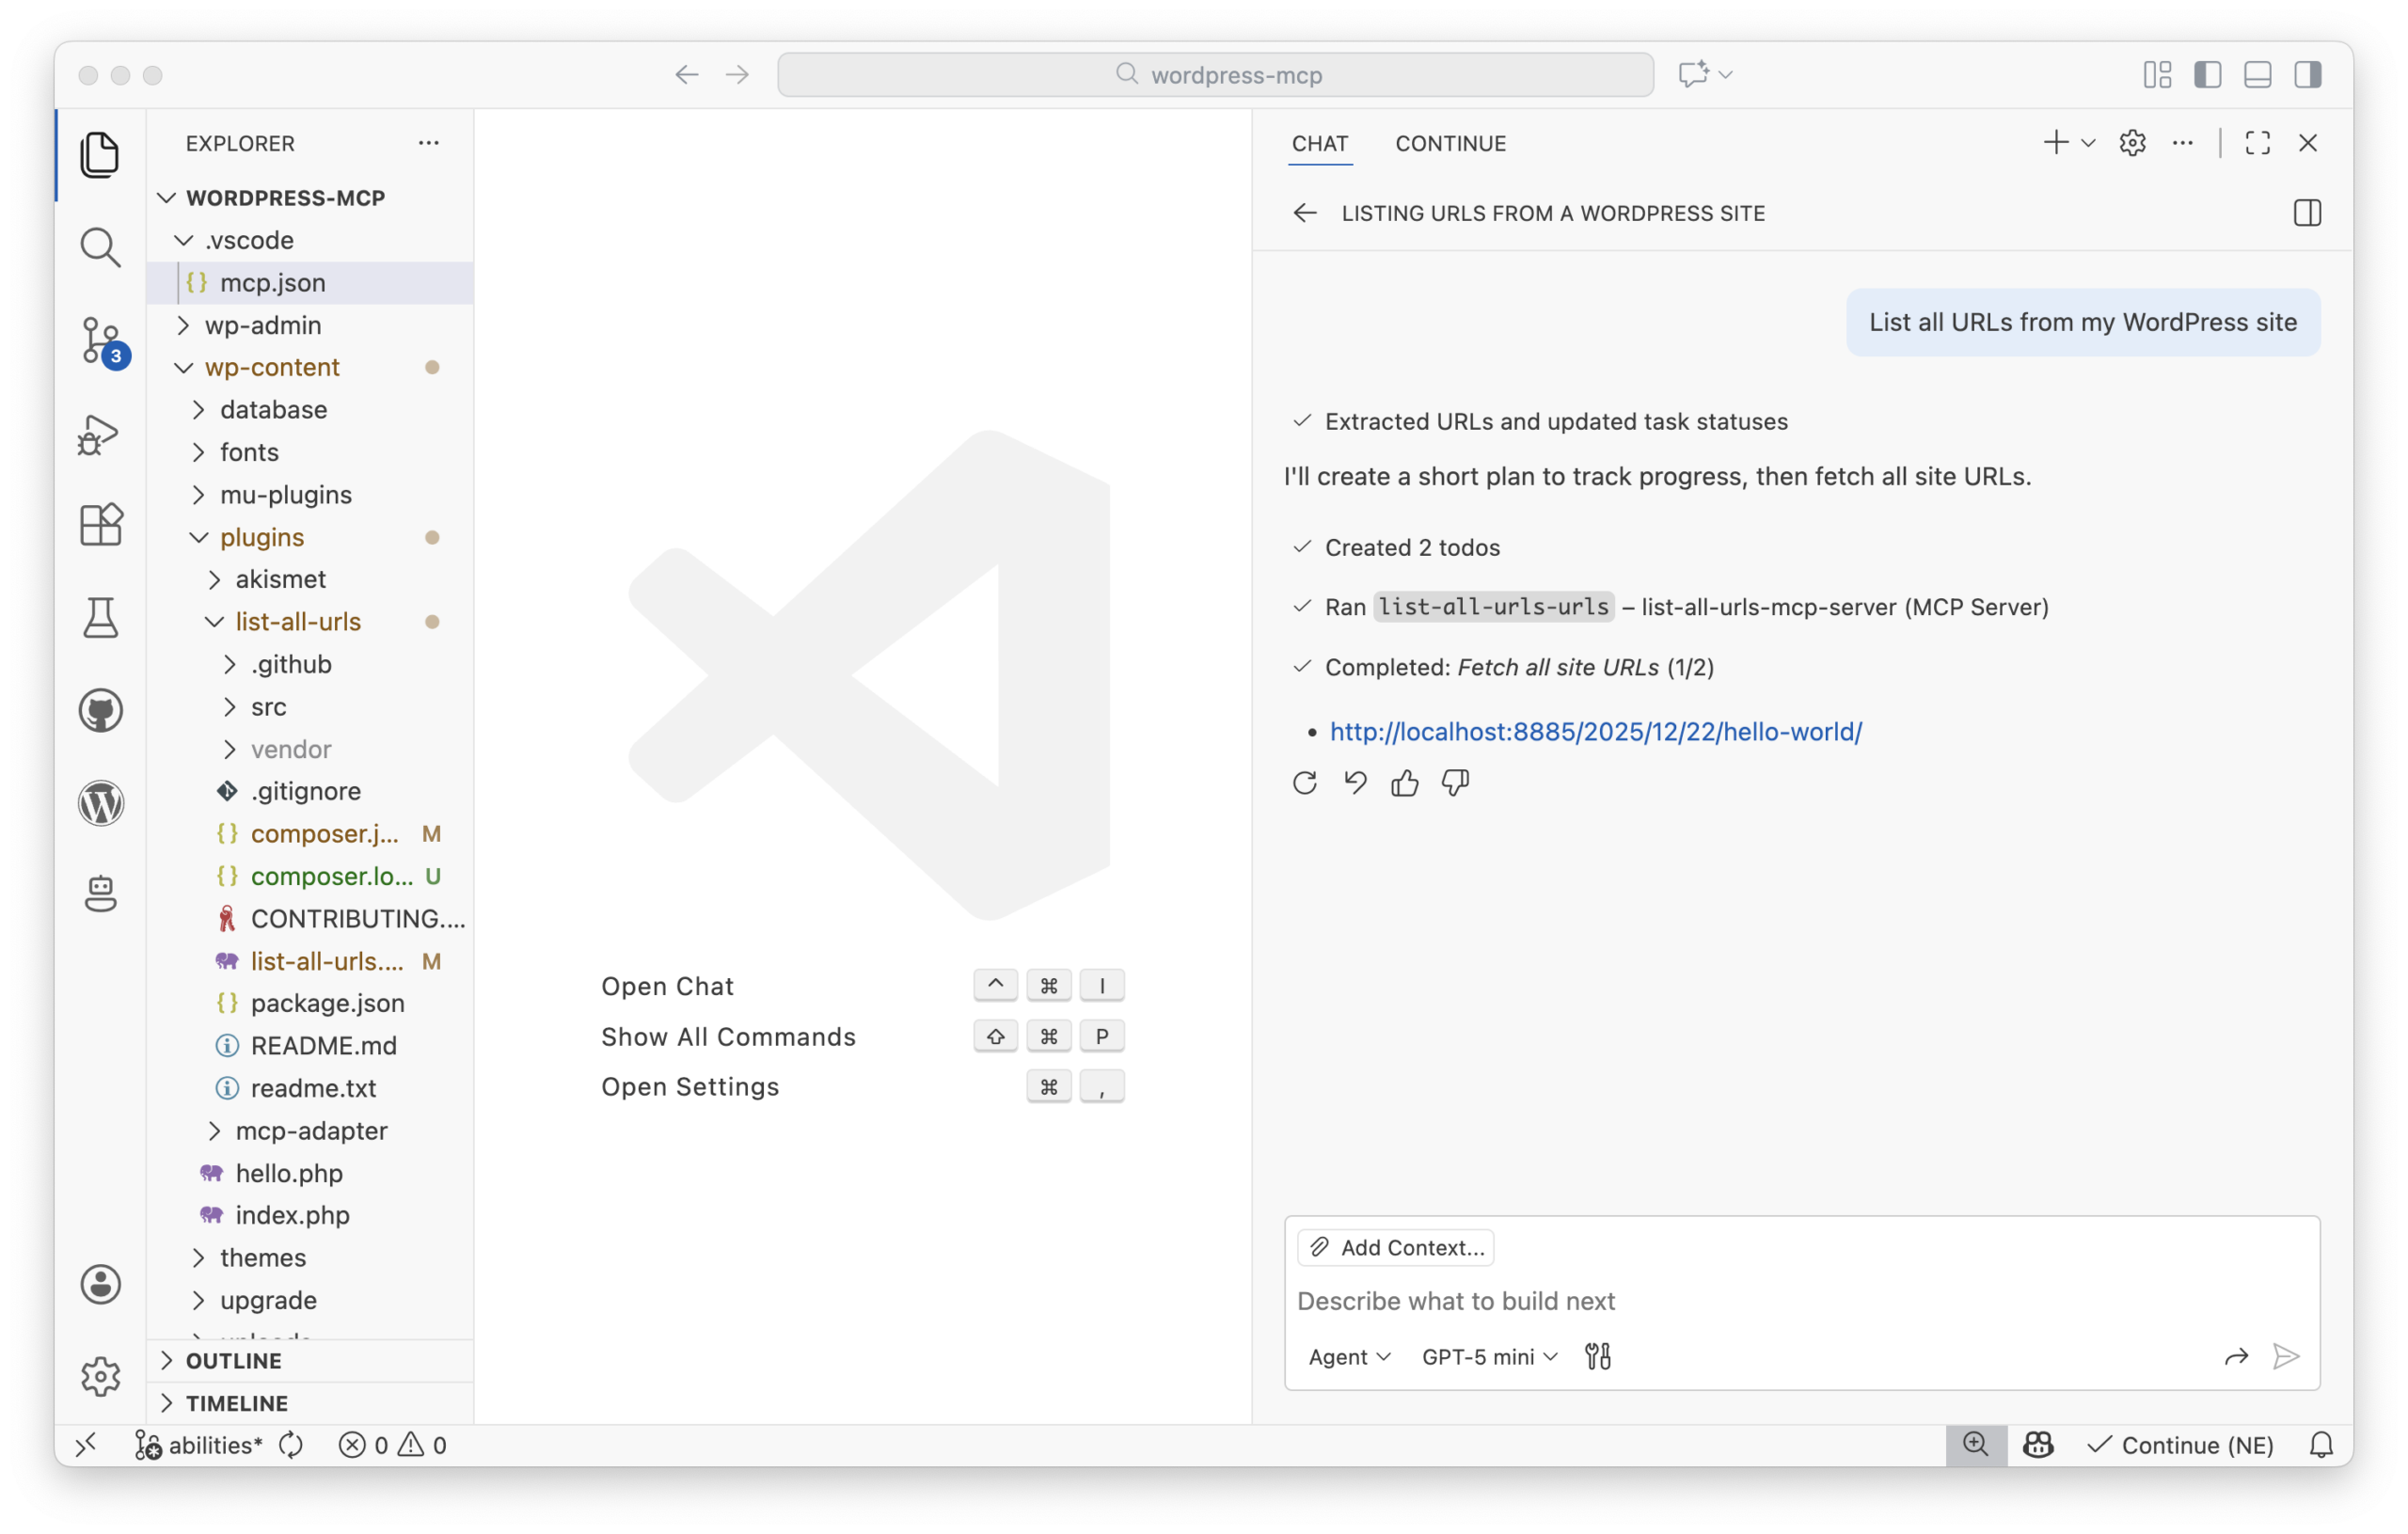
After updating the config, restart your AI application (or start the MCP server from within the app) so it picks up the changes. You should then be able to ask something like “List all URLs on my WordPress site,” and the client will call the list-all-urls-urls tool via the adapter.
Security and best practices (treat MCP like part of your app)
MCP clients effectively act as logged-in WordPress users. That makes them part of your application surface area, not a bolt-on convenience layer. A few practical guardrails go a long way.
- Use
permission_callbackcarefully - Each ability should check the minimum capability needed (
manage_options,edit_posts, etc.). - Avoid
__return_truefor destructive operations such as deleting content. - Use dedicated users for MCP access
- Especially in production, create a specific role/user with limited capabilities.
- Do not expose powerful abilities to unaudited AI clients.
- Prefer read-only abilities for public MCP endpoints
- For HTTP transports exposed over the internet, focus on read-only diagnostics, reporting, and content access.
- Implement custom authentication if needed
- The default authentication uses application passwords, but you can implement OAuth or other methods for better security.
- Monitor and log usage
- Use custom error and observability handlers to integrate with your logging/monitoring stack.
A minimal path to start experimenting
A basic “hello AI” setup is intentionally small: register an ability, require and initialize the MCP Adapter, then connect an MCP-aware client (Claude Desktop, Cursor, VS Code, or Claude Code).
If you already have plugins built on the Abilities API, the MCP Adapter effectively turns them into AI-ready APIs with minimal extra work. The safest way to ramp up is to start with non-destructive, read-only abilities, test locally, then expand to more complex workflows once you’re confident in permissions, authentication, and observability.
Documentation that’s worth keeping open while you build: the Abilities API docs and the MCP Adapter repo at https://github.com/WordPress/mcp-adapter.
WordPress.com vs self-hosted authentication
The same Abilities API and MCP Adapter concepts also power WordPress.com MCP tools, with one major difference: WordPress.com uses OAuth 2.1 for authentication (see https://wordpress.com/blog/2026/01/22/connect-ai-agents-to-wordpress-oauth-2-1/). On self-hosted WordPress, OAuth isn’t generally available out of the box, so setups commonly rely on JWT tokens or application passwords.
References / Sources
- From Abilities to AI Agents: Introducing the WordPress MCP Adapter
- Abilities API in WordPress 6.9
- Introducing the WordPress Abilities API
- Model Context Protocol
- MCP Adapter
- AI Building Blocks for WordPress
- MCP architecture: transport layer
- @automattic/mcp-wordpress-remote
- mcp-wordpress-remote troubleshooting
- Application Passwords integration guide
- WP-CLI
- VS Code MCP servers configuration
- List All URLs plugin
- MCP Adapter installation (Jetpack Autoloader recommendation)
- Connect AI Agents to WordPress with OAuth 2.1
- Build MCP Tools Like Ogres, With Layers
Sarah Mitchell
Editor of the English team, DevOps and cloud architecture specialist. I feel at home in AWS and Kubernetes environments. I believe in continuous learning and knowledge sharing.
All posts