
WordPress Studio 1.7.0 Brings a Real CLI: Local Sites, Preview Deploys, and WP-CLI Built In
WordPress Studio 1.7.0 is a meaningful step forward if you build WordPress sites locally and prefer workflows you can script, automate, and run from a terminal. The headline feature is Studio CLI v2: what used to be mostly about preview sites is now a full command-line companion for much of your Studio workflow-local site lifecycle, WordPress.com authentication, preview deployments, and a built-in WP-CLI bridge that “just works” in the right environment.
This post breaks down what the new Studio CLI can do, how to enable it, the exact commands you’ll reach for daily, and how it fits neatly into AI-assisted workflows (think Claude Code or Cursor) where an agent can run real commands against your local environment.
If you want the canonical command reference and advanced flags, the official docs are here: Studio CLI documentation.
What a CLI is (and why Studio having one matters)
A CLI (command-line interface) is a way to control a tool by typing commands in a terminal instead of clicking through UI screens. Developers tend to gravitate toward CLIs because they’re:
- Fast: spin up, change, or remove environments with a single command.
- Repeatable: run the same commands on any machine, or bake them into scripts.
- Automatable: let build systems and AI agents run commands for you.
Even if you don’t live in a terminal, Studio CLI is worth caring about because it becomes the common “language” automation tools can use to interact with WordPress Studio. Once enabled, your editor, scripts, or AI assistants can do things like create a new site, run database upgrades, or publish a preview without you hopping through multiple screens in the Studio app.
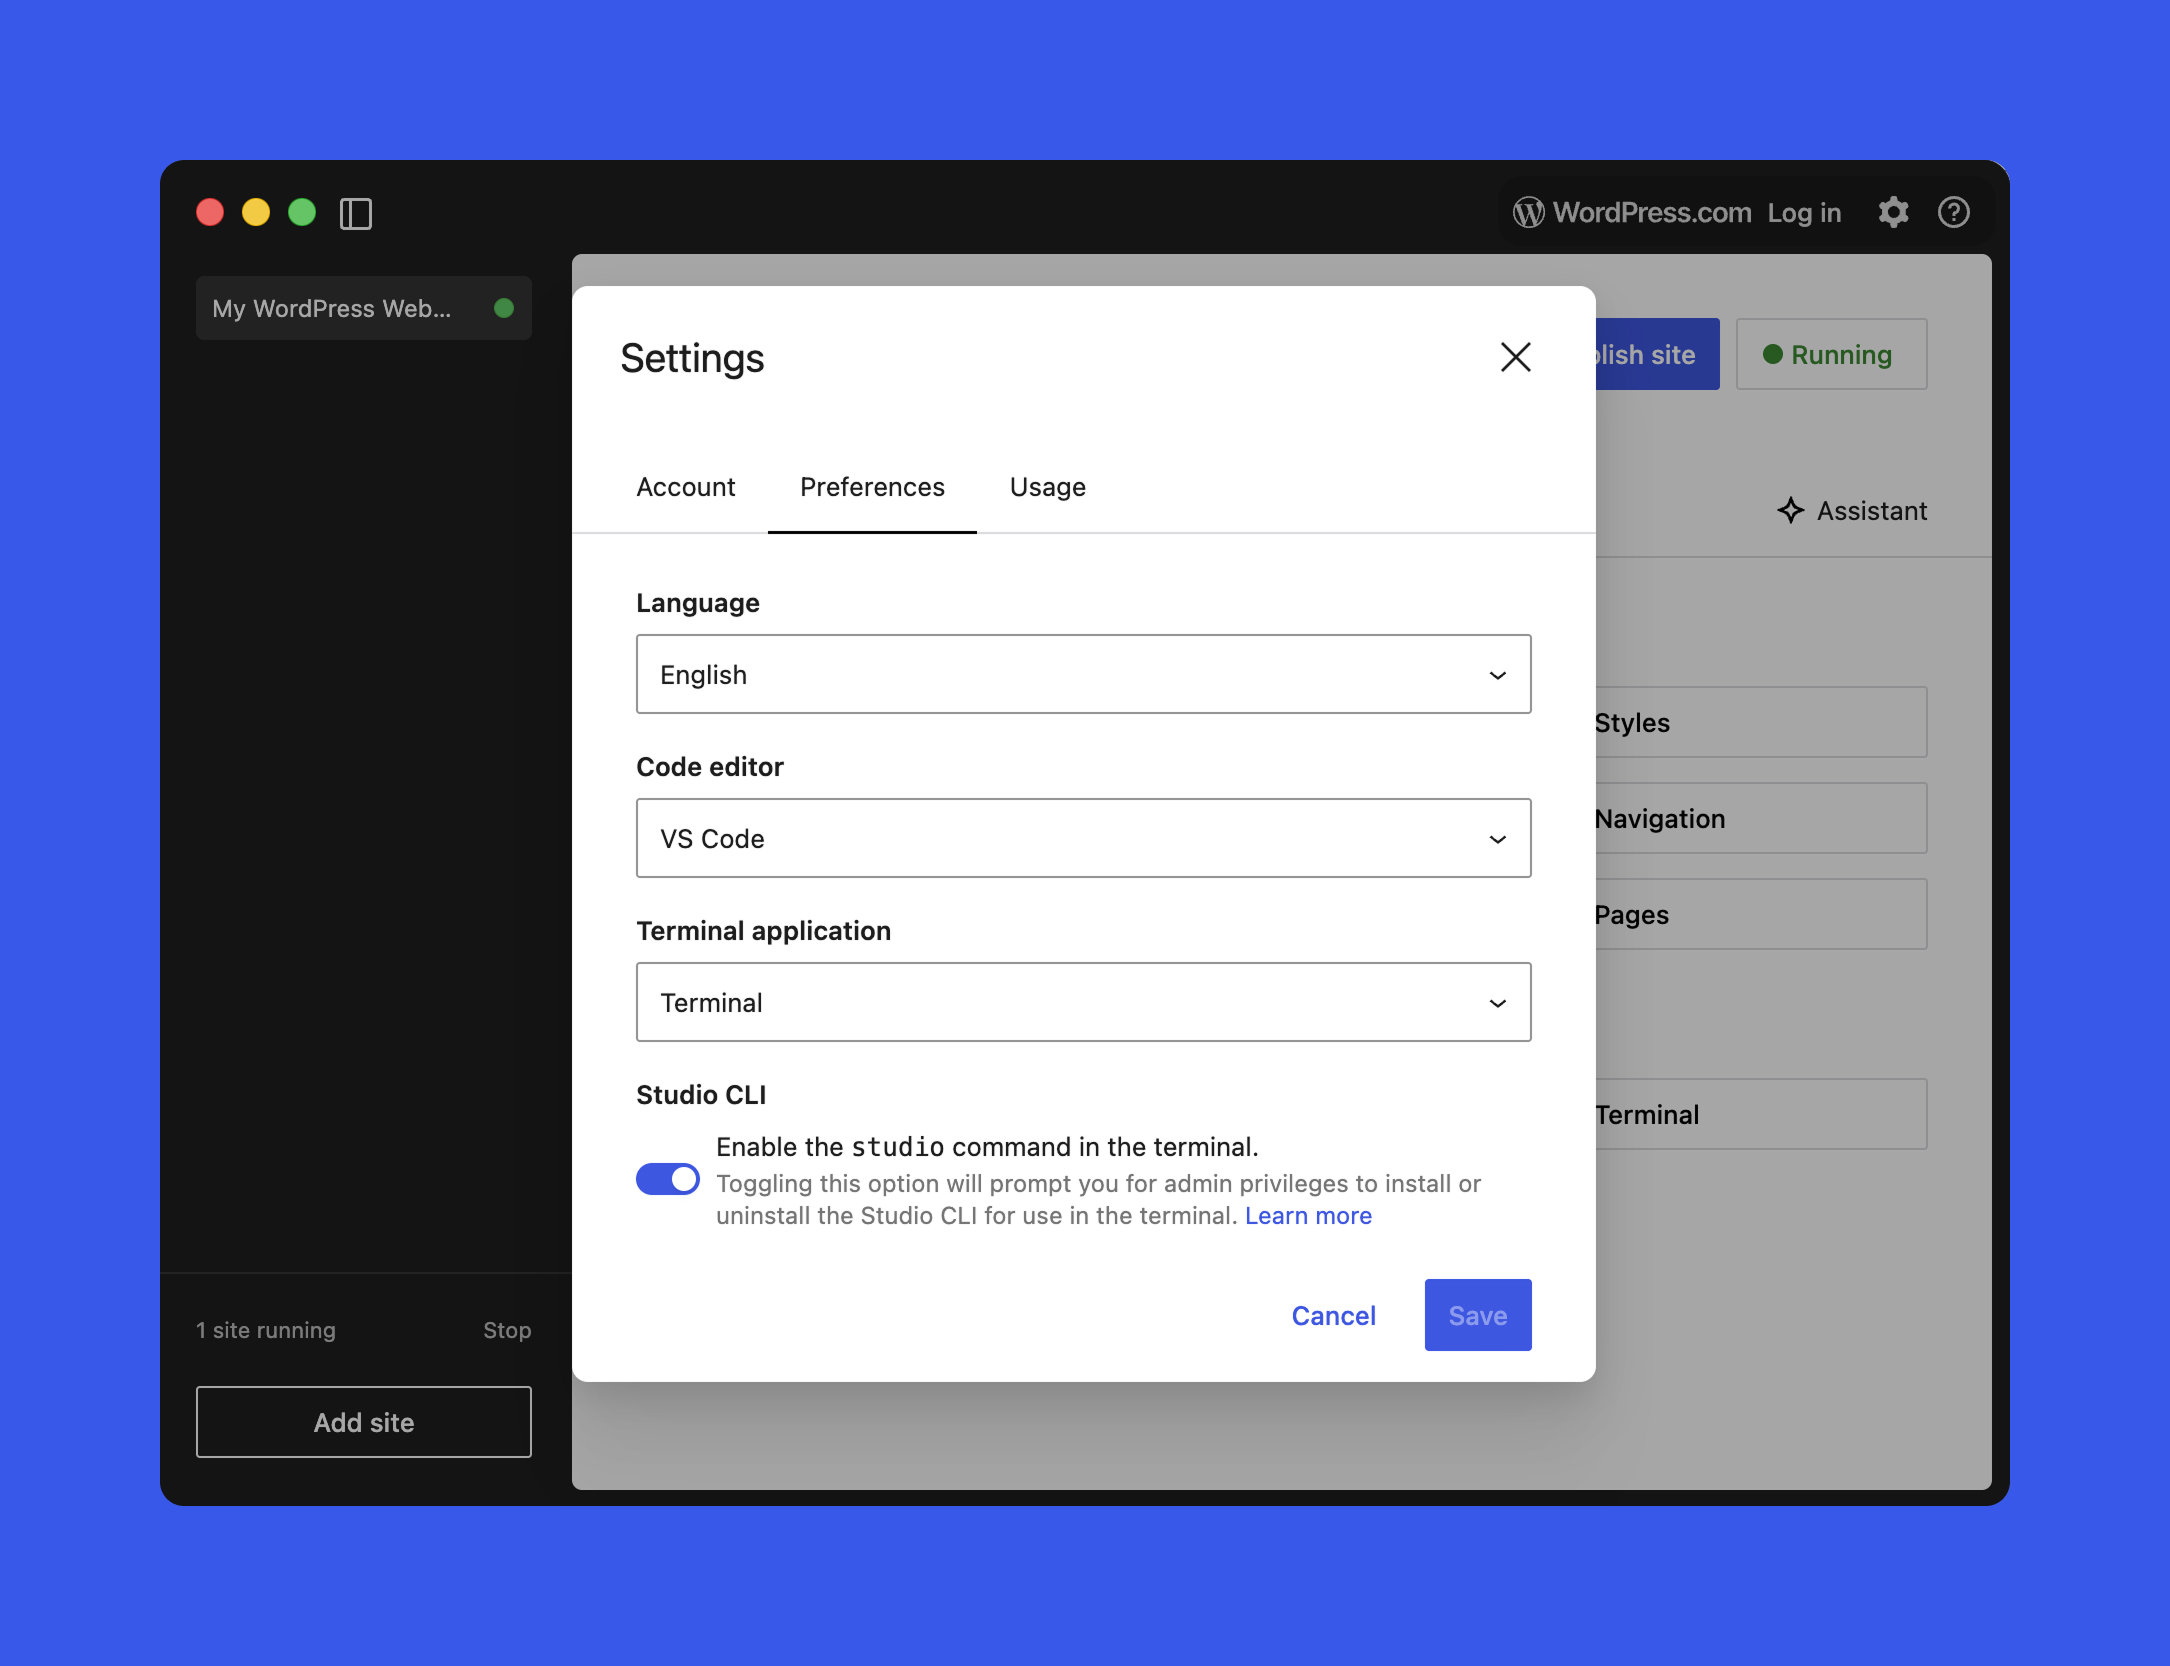
Enable the Studio CLI (one-time setup)
To start using Studio CLI in WordPress Studio 1.7.0, do the following:
- Open the WordPress Studio application on your machine.
- From the main menu, open the Settings modal (or click the gear icon in the top-right corner).
- Enable the Studio CLI option and click Save.
- On macOS, enter your computer password when prompted to allow installation.
After that, you’ll have a global studio command available in your terminal. The general shape is:
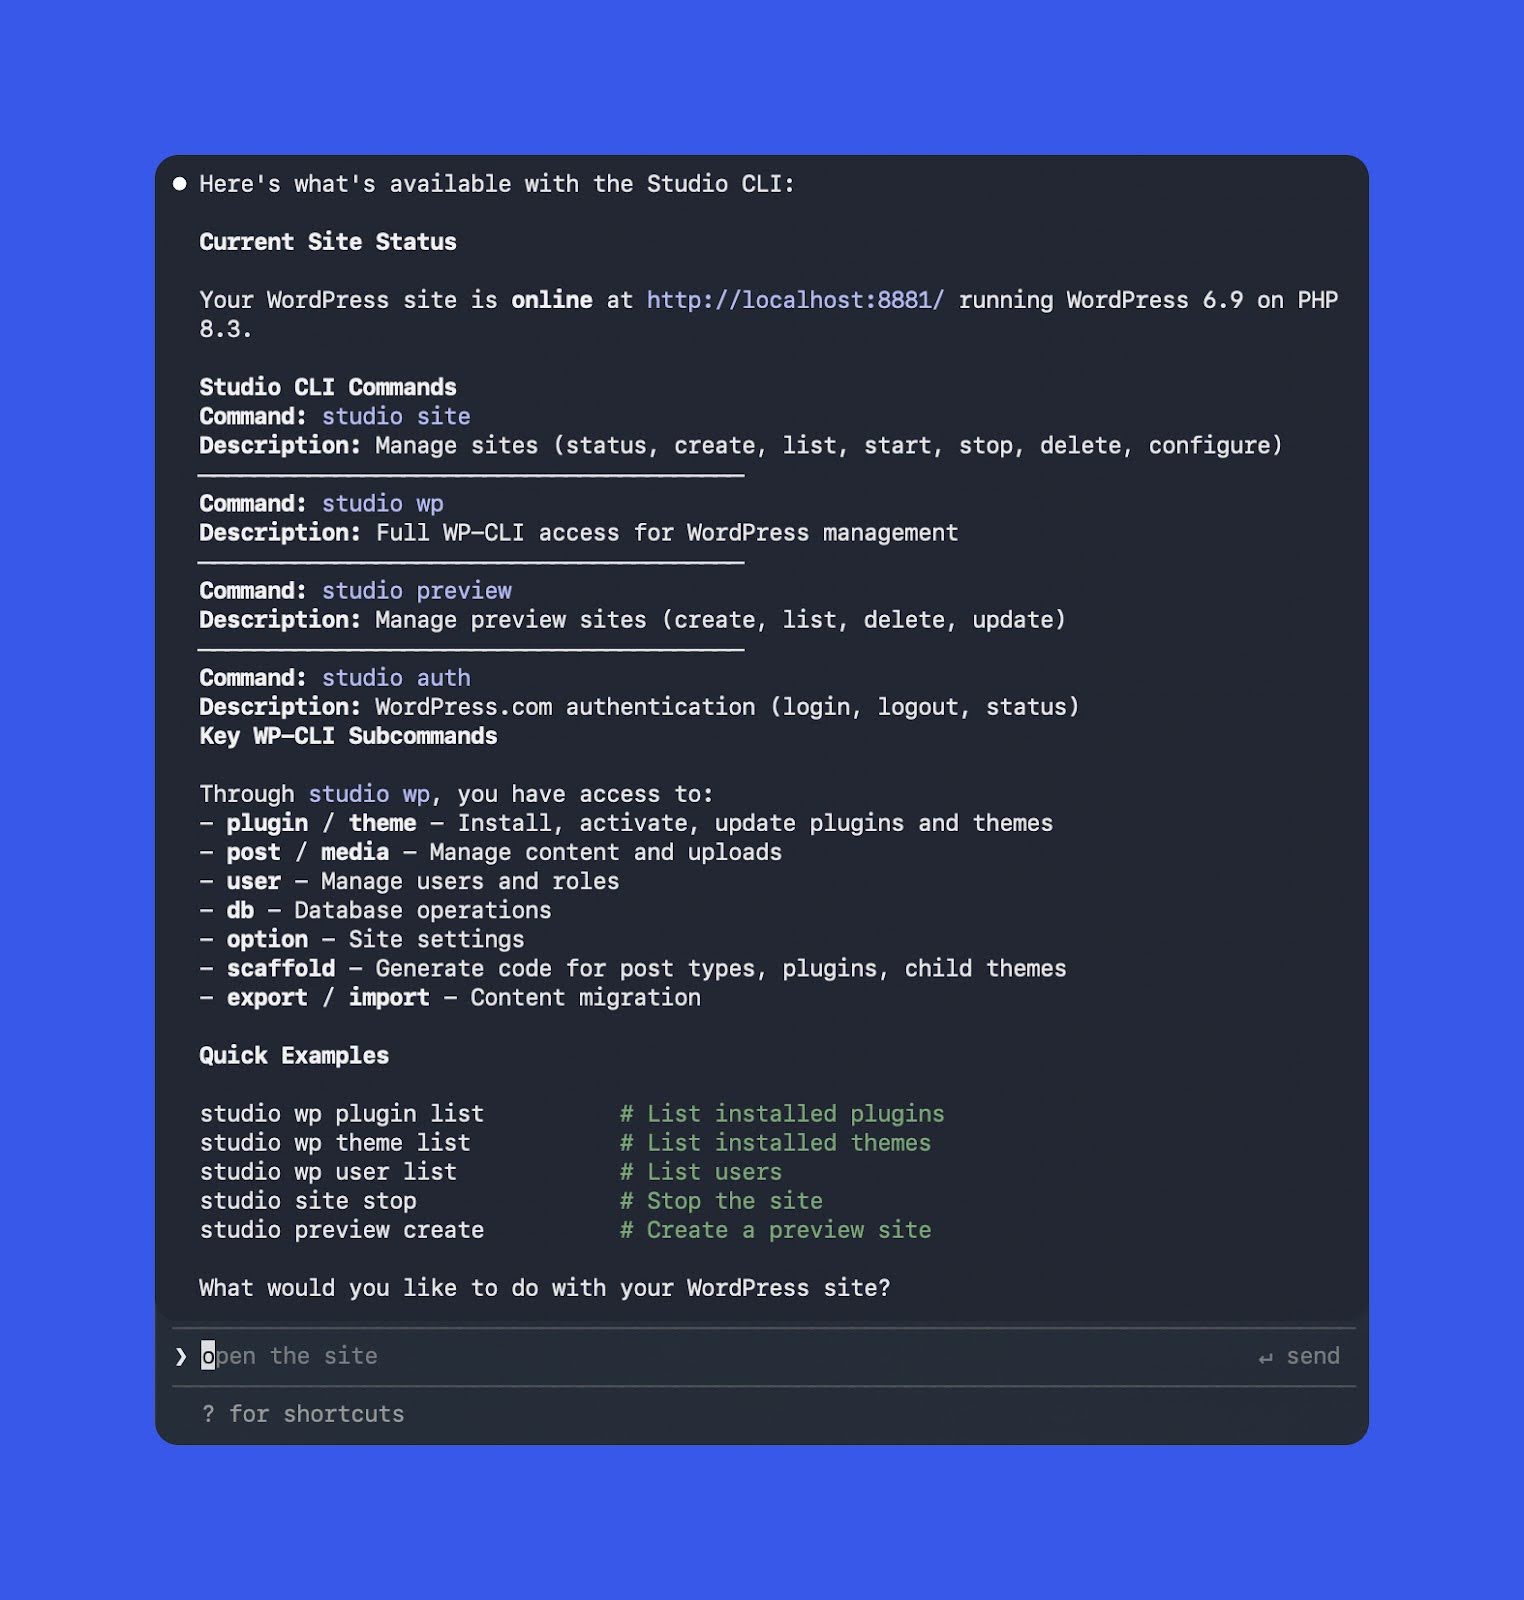
studio <area> <command> [options]What Studio CLI v2 covers in Studio 1.7.0
In Studio 1.7.0, the CLI is organized into four main areas:
- Authentication: manage your WordPress.com account for features that require it.
- Preview sites: create and update WordPress.com hosted preview sites.
- Local site management: create, start, stop, configure, and delete Studio-managed local sites.
- WP-CLI integration: run WP-CLI inside correctly configured Studio environments, without installing WP-CLI yourself.
At any time, you can get an overview by running:
studio --help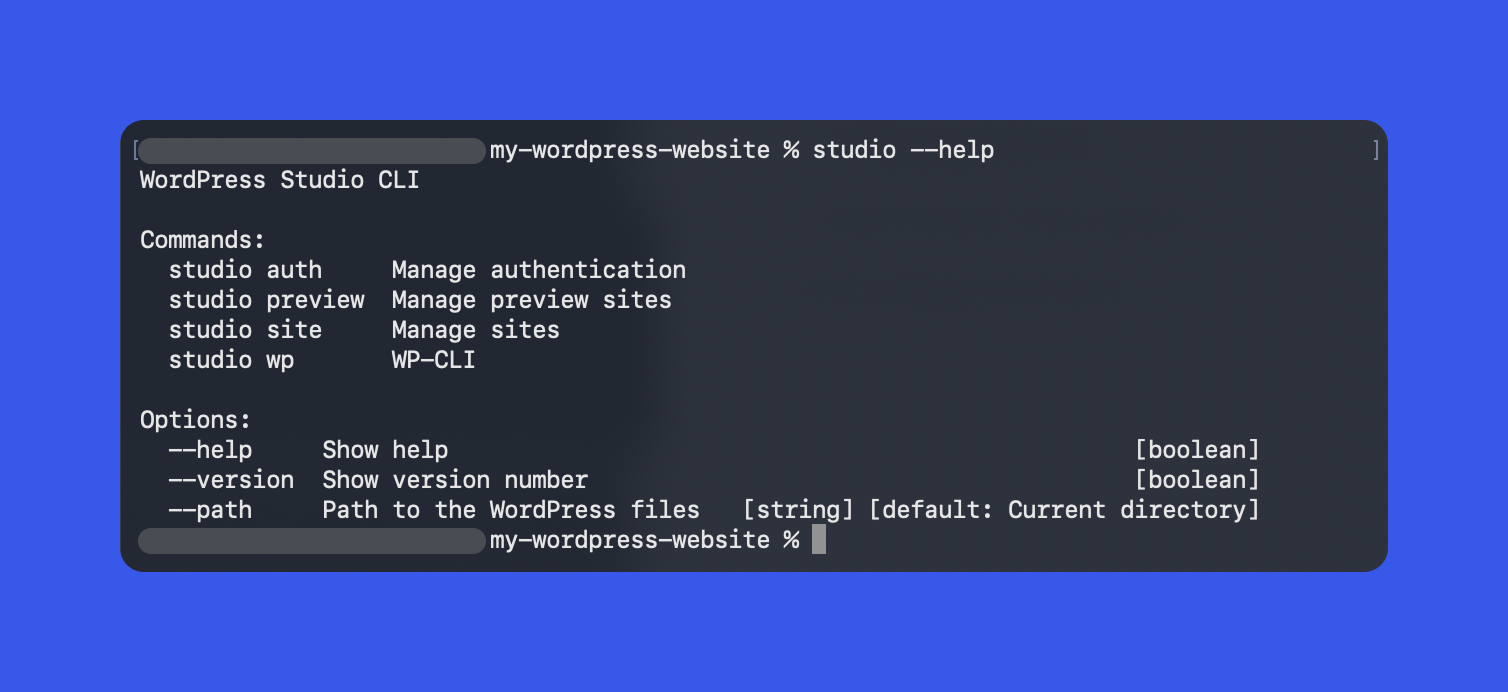
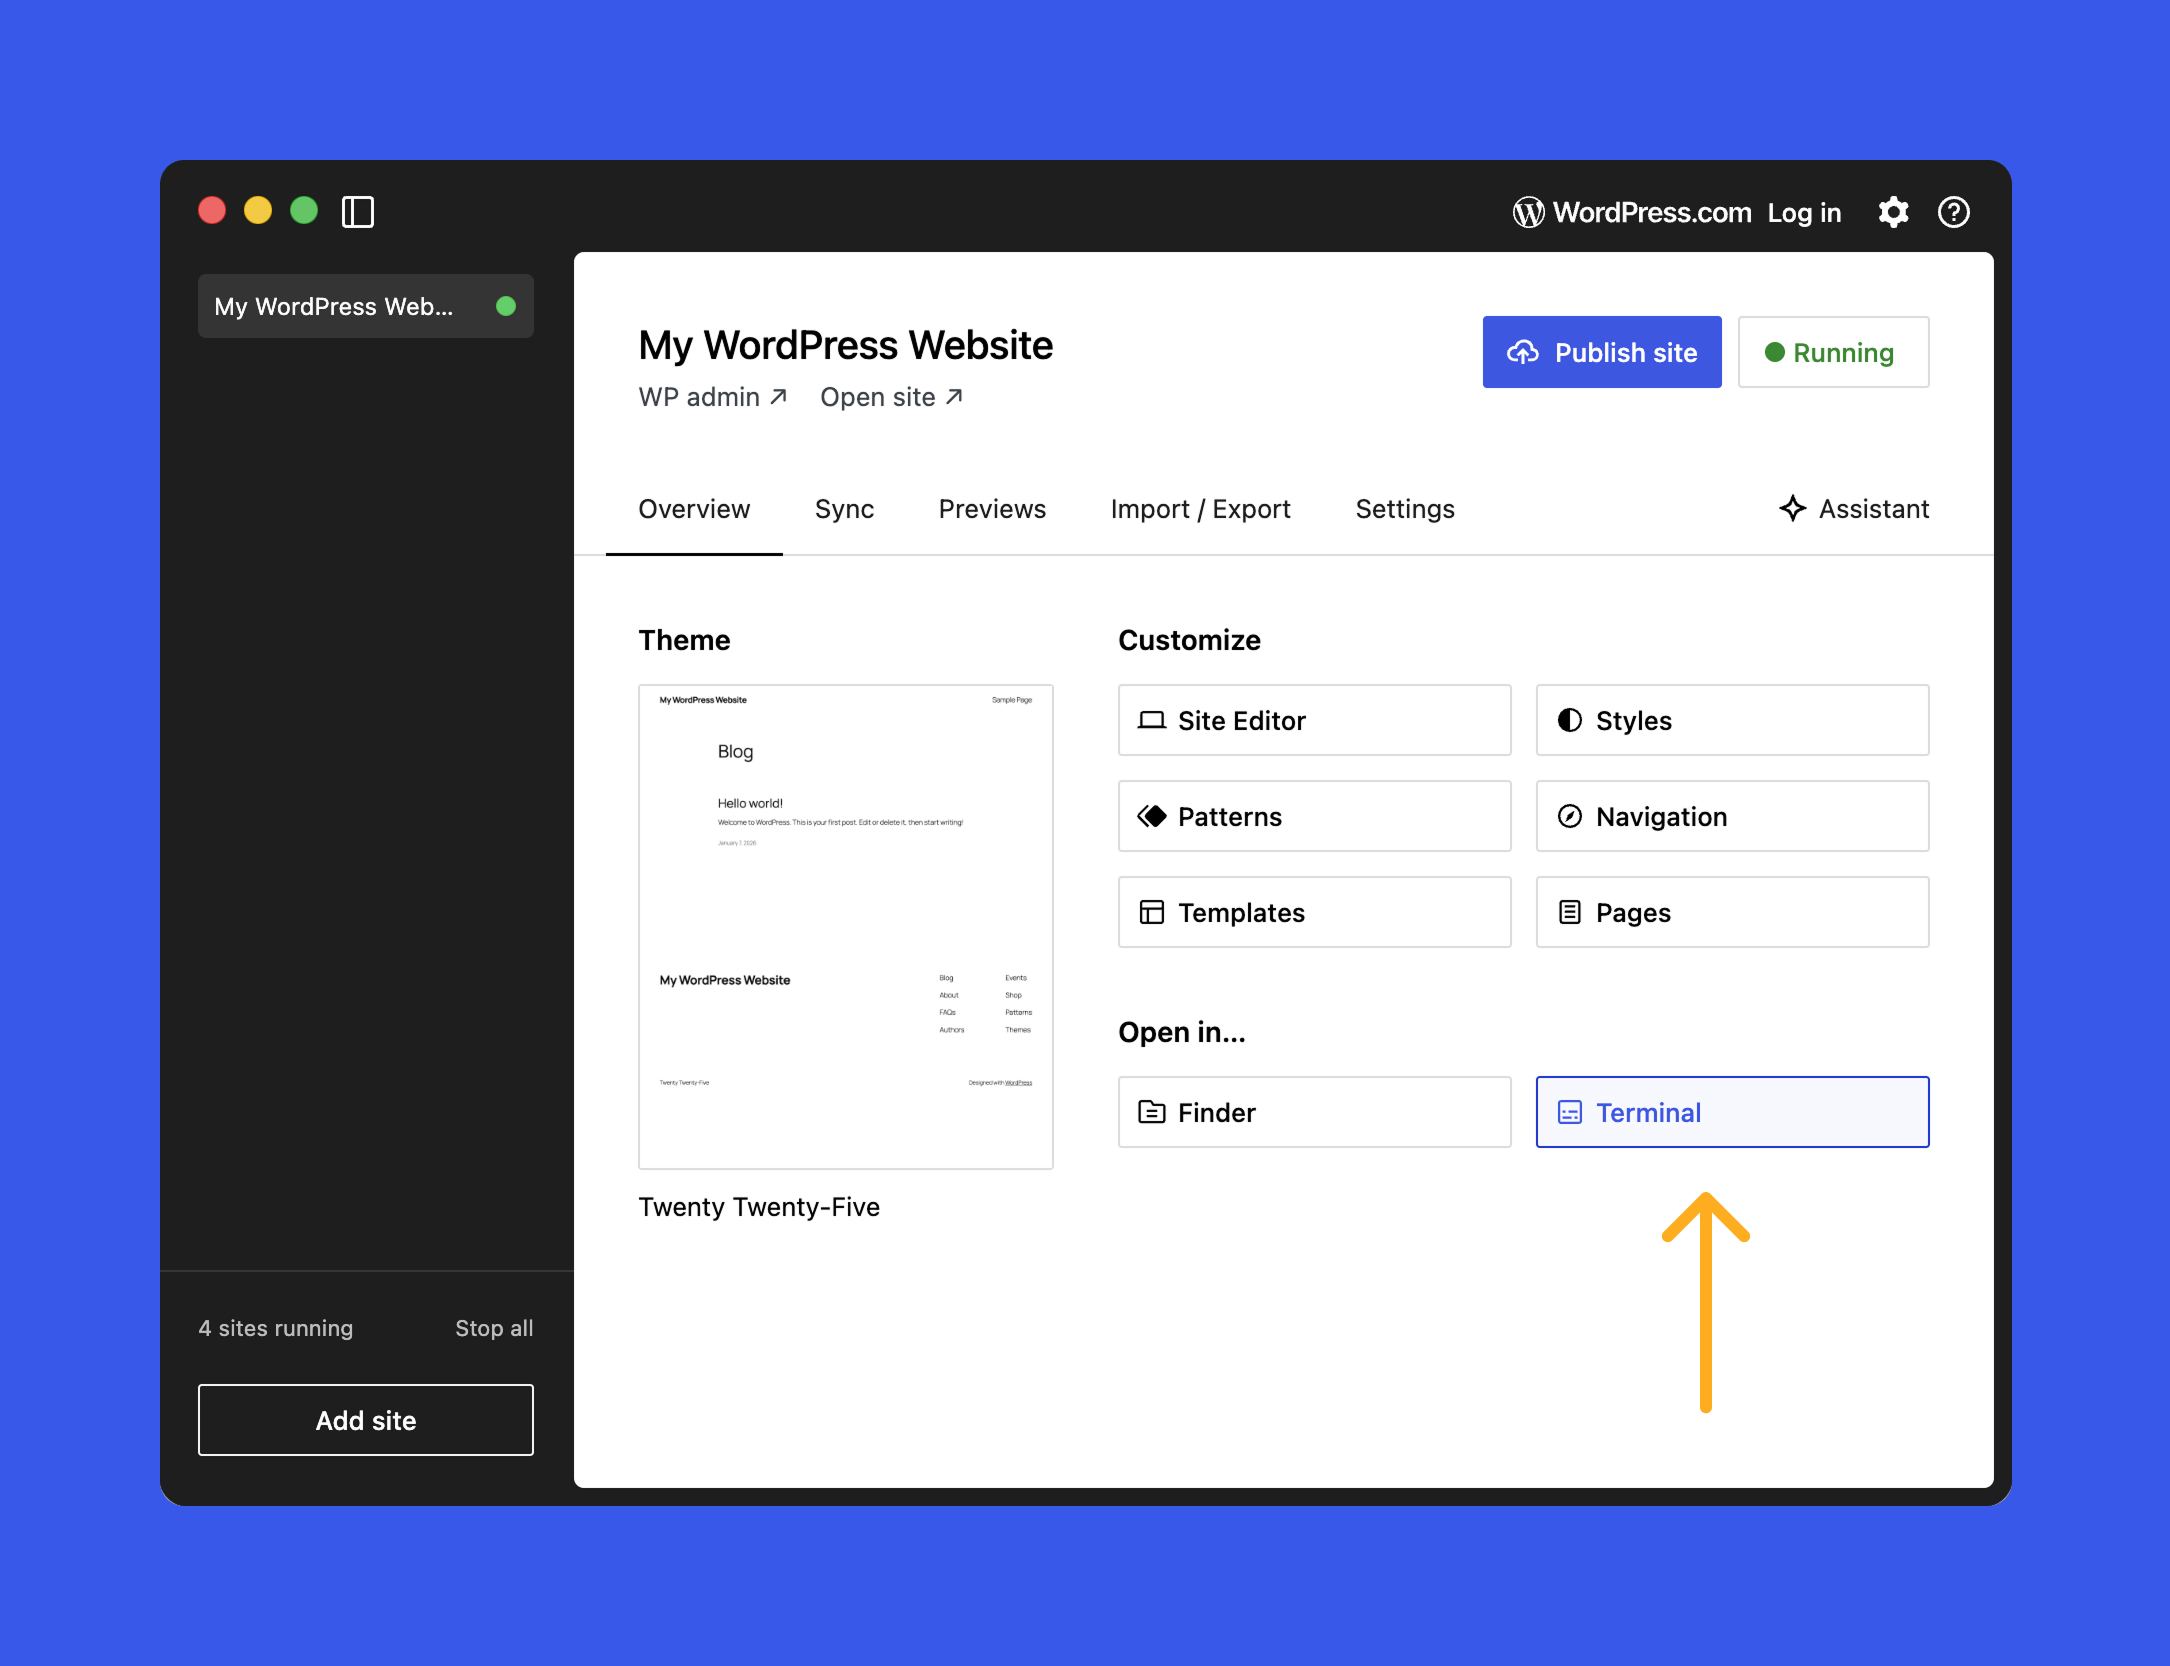
Most commands are meant to be run from the root folder of a Studio-managed site. If you want a quick jump into the right directory, Studio includes a Terminal button on a site’s Overview tab that opens the correct folder in your terminal.
Local Studio site management from the terminal
The biggest practical upgrade in Studio CLI v2 is end-to-end local site management. Instead of flipping back to the Studio UI for routine operations, you can handle the full lifecycle-create, inspect, start/stop, configure, and clean up-directly from the terminal. That’s faster day-to-day, and it’s also what makes scripting and AI automation viable.
Everything revolves around studio site. Common commands include:
studio site status    # Get status of site
studio site create    # Create a new site
studio site list      # List sites
studio site start     # Start site
studio site stop      # Stop site(s)
studio site delete    # Delete site
studio site set # Configure site settingsCreate a local site with one command
Use studio site create to spin up a new site in your current directory-or point it at a specific path. A few examples:
# Create a new site with default options in the current folder
studio site create

# Create a new site with a custom domain and HTTPS
studio site create --https --domain hello.wp.local

# Create a site in a different directory
studio site create --path /path/to/siteWhen you create a site, the CLI will:
- Set up a local WordPress environment.
- Start the WordPress server.
- Open WP Admin in your browser when it is ready.
You can run studio site create from an empty folder, or from a directory that already contains a WordPress site that isn’t registered in the Studio app yet.
List, inspect, start, and stop local sites
When you’re juggling multiple projects, list and status become the fastest way to see what Studio knows about and what’s currently running:
studio site list       # Show all local sites known to Studio
studio site status # Status of the site in the current directoryThe status output includes:
- Whether the site is running.
- The local URL (for example
http://localhost:PORT). - Key configuration details such as PHP version and login information.
Starting and stopping are intentionally simple, which also makes them great building blocks in scripts that need to boot a site, run work, then shut it down:
studio site start
studio site stopDelete and configure sites safely
To remove a site from Studio (and optionally wipe the local files), use:
studio site delete          # Remove the site from Studio
studio site delete --files # Remove the site and filesFor configuration changes, studio site set lets you update settings for a specific local site:
studio site set [options]Typical things you can change include:
- Change the PHP or WordPress version.
- Update the local domain or port.
- Toggle features that affect how the local environment runs.
Tip
Run studio site set --help to see the full list of available options.
WordPress.com authentication from the terminal
Some Studio features (notably preview site creation and updates) require a logged-in WordPress.com account. Studio CLI v2 adds dedicated auth commands so you can manage this without leaving the terminal:
studio auth loginopens a browser-based login flow and returns a token you paste back into the terminal to finish authentication.studio auth statusshows whether you’re authenticated and which account is active.studio auth logoutdisconnects the CLI from WordPress.com and clears stored credentials.
If you try to run an authenticated command while logged out (for example, studio preview create), the CLI will guide you through logging in.
Preview sites: deploy and update shareable environments from the CLI
Preview sites are temporary, shareable environments hosted on WordPress.com that mirror your local Studio site. They’re particularly useful when someone needs to review your work but doesn’t have (or want) a local WordPress dev stack.
Studio CLI includes a complete preview workflow:
studio preview create          # Create a preview site
studio preview list            # List all your preview sites
studio preview update <host>   # Redeploy changes to a preview
studio preview delete <host> # Remove a preview siteTip
Run studio preview list to see all previews associated with your WordPress.com account. Use the host value from that output when running studio preview update or studio preview delete.
Built-in WP-CLI via studio wp (no separate install)
WP-CLI is the official command-line interface for WordPress itself. With Studio CLI v2, you get WP-CLI through a dedicated studio wp wrapper, so you don’t need to install or configure WP-CLI manually:
studio wp [<wp-cli-command>] [<wp-cli-arguments>...]From your site root directory, you can run the same kinds of day-to-day commands you’d expect:
studio wp core versionshows the WordPress version for the current site.studio wp plugin listlists installed plugins (and their status).studio wp core update-dbruns required database updates after a WordPress update.
The key benefit is that Studio sets environment variables, paths, and credentials for you, so WP-CLI runs against the correct database and files with no extra setup.
Using Studio CLI with AI coding tools (Claude Code, Cursor, and similar agents)
Studio CLI v2 fits naturally into AI-assisted development because these agents can read your local theme/plugin code and execute real terminal commands. That makes it practical to delegate repetitive work-environment setup, diagnostics, preview deployments-while still keeping everything grounded in your actual local environment.
In practice, an agent can:
- Use
studio sitecommands to create, start, stop, and manage local environments. - Run
studio wpfor diagnostics, database tasks, and content management. - Create and update WordPress.com preview sites for review without leaving your editor.
1) Give the agent the missing context
Most AI tools won’t automatically know what WordPress Studio is or what Studio CLI can do. Start by explicitly stating what the current directory is and what command it can use.
For example, if you’ve opened a local Studio site folder in your terminal, you can tell an agent (like Claude Code) something like:
This is the folder for a WordPress Studio site. You have access to the Studio CLI, which can be invoked by running
/studio. Start by exploring the available options.
From there, you should see it discover the CLI surface area (similar to running studio --help). The example below was generated using Opus 4.5.
2) Automate environment setup
Once the agent understands Studio’s capabilities, you can hand it routine setup tasks. For example:
Set up a new local WordPress site using Studio with the name “Nick’s Site”
/
Behind the scenes, it might execute a command like this:
studio site create --path "../nicks-site" --name "Nick's Site" --skip-browserHere’s what that looked like in Claude Code (again using Opus 4.5):

3) Debug and verify with WP-CLI
WP-CLI is also a strong pairing with AI when a site is misbehaving and you want signal fast. A prompt like this is enough to kick off a structured diagnosis:
Use the Studio CLI to run WP-CLI checks and figure out why this site is failing, then propose fixes.
/
From there, the agent can:
- Run
studio wpcommands (for example,plugin list,theme list, orcore update-db) to gather diagnostics. - Suggest (or apply) code and configuration changes based on what it finds.
- Re-run the same WP-CLI checks to confirm the issue is resolved.
If you want a broader primer on WP-CLI capabilities, WordPress.com has a solid overview here: great overview of WP-CLI.
4) Create (and keep updating) preview sites
Preview sites are a standout Studio feature, but clicking through UI to create and redeploy can get old. The CLI reduces preview management to a couple of commands-and with an AI agent, it becomes even more hands-off.
For example, when you’re ready to share work, you can prompt:
Can you spin up a preview site for me?
/
If you’re not authenticated, the agent will route you through login, then create the preview and return the URL. Output typically looks like this:
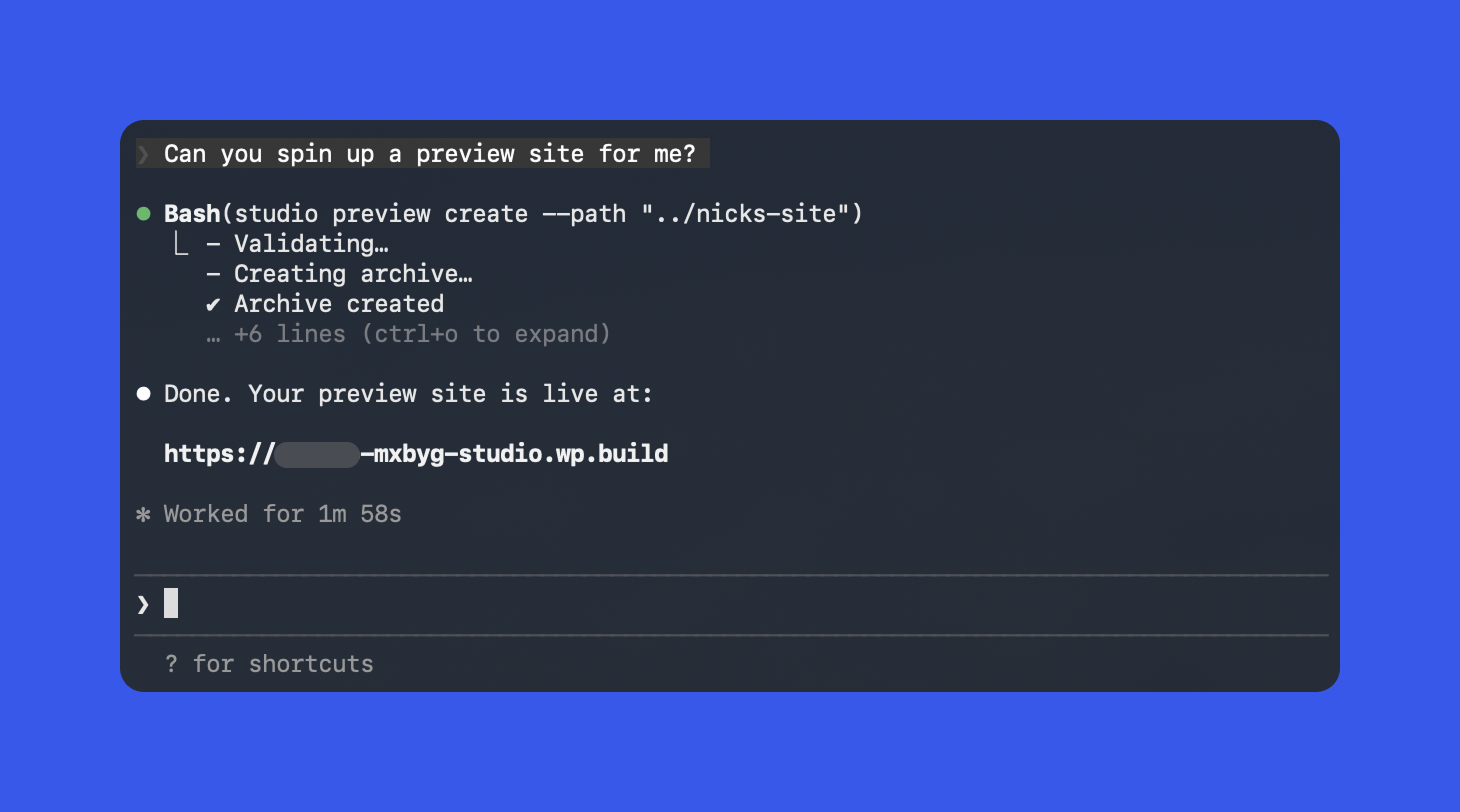
As you keep working locally, you can ask the agent to update the preview periodically. If the agent is also helping build the theme/plugin/site, you can even enforce a rule like: after any major change, update the preview site automatically so the shared link stays current.
Best practices when pairing AI agents with Studio CLI
AI agents can be extremely effective copilots when combined with a real CLI. But a bit of process up front helps you avoid surprises-especially around commands that delete things or modify databases.
- Work from the Studio site root (or use
--path). This keeps commands pointed at the project you actually intend, which matters when you have multiple sites. - Set clear boundaries in your prompts. Examples: “Do not delete sites,” “Only run read-only
studio wpcommands,” or “Ask before running database migrations.” - Double-check destructive operations. For commands like
studio site deleteandstudio preview delete, have the agent show the exact commands it plans to run before executing anything.
Where to go next
Studio CLI v2 in WordPress Studio 1.7.0 makes local WordPress development more scriptable and automation-friendly-whether you’re the one typing commands, or you’re delegating work to an AI agent that can operate your environment safely.
If you want to explore the full surface area (including advanced flags and deeper workflows), the official docs are the best companion: Studio CLI documentation.
You can also get WordPress Studio here: Try WordPress Studio now.
James O'Brien
Backend developer, Node.js and Go specialist. API design and microservices architecture are my main focus. I love diving deep into technical details.
All posts